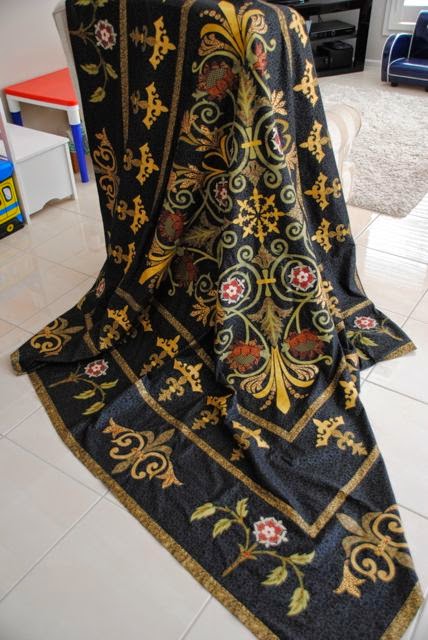
I look back at the blog and see that only one week ago the Thorngrove Manor quilt was ready to be quilted and I can now report that the quilting is complete! I am shocked that I have managed to do as much as I have but I do know I have put in very long days starting on March 24th. My wonderful friend Jude is an angel sent from heaven and she worked her machine quilting magic, by not only basting around the appliqué but also stitching some stunning cross hatching which I think is perfect. So here is the quilt on her mega machine……
Jude lives over 4 hours from our home but she drove up to Adelaide on Monday for an appointment and to pick up the quilt and then and we met her halfway on Friday afternoon. Such incredible progress and I have put in about 20 hours since Friday night! First up I needed to complete some missing machine appliqué that Jude found…..I often find missed bits when I start quilting!
I have to tell you this is a very large quilt and as time has gone on it is getting very heavy, so Larry caught me with it draped over the shoulder trying to support it while I stitched!
So glad it is the cooler months!…...
I decided to do feathers between the two borders of crosshatching. All I mark is the spine in a chalk pencil and then my method of feathers comes from watching the DVD's I purchased with Karen McTavish's two machine quilting books. They are fabulous and I watch them frequently for inspiration - I love how Karen does her feathers…..even I can do them and I do not enjoy machine quilting one bit!!
In fact I loathe machine quilting - it is the one part of the entire process that I dislike the most. Give me the drawings and the appliqué every day and I am happy! The cross hatching that Jude has done is superb and I hate to think how many weeks it would have taken me!!
Our days have been a little gloomy with the first day of Winter today so lots of lights were needed - but I won't show you the floor lamp I had standing precariously on top of the sewing table! (We are looking forward to down lights being installed very soon!). I needed an extra table to the side of me to support the weight of the quilt……...
I never used to use gloves when I quilted - perhaps an association of why one wears gloves from nursing days??!! But several friends have encouraged me to and I have not looked back. It eases the joints and grips the quilt….I should have used them years ago!
My preference for the free motion foot is a closed clear one - it doesn't catch any threads and I get better vision of the quilt…..
Statistically I have put in over 170 hours on this quilt and that includes regular cleaning and needle changing - in fact I used 9 needles during the process and over 24 kms of thread - almost 15 miles and that doesn't include the bird's nest of basting thread from Jude! (or her quilting thread and hours)….
The final process was attaching over 400 inches of binding! I cut my binding 2 1/2" wide and attach it to the quilt with a little wider than a 1/4" seam. I find a little more that 1/4" allows me to have the preferred "fat and full" binding. This is where your quilt will wear out first so it does need to be firm….
I stitch the usual mitred corners with the first fold up and second fold down…...
And then I join the two ends with the 45 degree angle as was used to make the long binding strip. To join the ends I found this formula years ago and it works well for me. You need about a 6" end to play with at the beginning and end of your binding strips. You then fold these ends so they meet and then fold back as pictured……..
Trim each end from the fold a little less than half the finished cut width of your binding. So mine is 2 1/2" so I trimmed a little less than 1 1/4". With the bulk of the quilt closest to your body you then open the strip and pin right sides together…….
Now you are ready to join the ends by stitching the 45 degree angle as you did before. Trim the seam….
and then finger press the seam open. Continue to attach the binding to the quilt and voila….it fits perfectly and no-one will know where you started or ended!
So today was a full day of more feather quilting between the two rows of cross hatching…….
And tonight all the trimming of threads and finally trimming back the binding ready for hand stitching…...
I was thrilled to find this extra wide backing fabric from Widebacks……...
So all that is left is to hand stitch the binding (and attach a label), to the back of the quilt which I envisage will take another 8 or so hours. Here it is tonight on a double bed……..
and I will be pleased to see it in all its glory in this room on this bed …….
So the sewing corner is cleaned up and resting for the next project which should have been finished weeks ago for a workshop in just over 8 days!!
This is a small portion of the project all hand stitched this time and I think William Morris might be happier that I am back to some more hand work (but that is after the Thorngrove binding!). Here you can see a little of it - my version of burden switch which I am loving…….
So thanks for sharing in this journey and next time I hope to share photos of the quilt on the king sized King's chamber bed! Take care wherever you are x
I am very excited to share that all the machine appliqué on the Thorngrove Manor quilt is complete! I've been working most days for the past month sometimes putting in 10-12 hours a day which means there have been a couple of nights when my light has gone out way past 2am! But it has been worth it and there is nothing like a deadline to get things done! These are the designs for Border 2. I've used a teflon appliqué mat to help with the process. Once the fusible paper is peeled off the back of the appliqué pieces they are placed on the mat directly over the pattern. This way the pieces can be ironed onto the mat, allowed to cool and then peeled off ready to press onto the background. This method makes placement much easier and is a great way to hold all the bits together in the correct place…….
Then it is time to press the sections onto the border with the assistance of a tape measure, pins and sometimes a chalk marker……..
A few days ago I was preparing the final 28 flower motifs for Border 3 ………..
I had quite a production line so this time I used baking paper from the kitchen cupboard. I was surprised it took two hours just to assemble the flowers but I was glad they were all attached making it easy to press onto the final borders……...
Tweezers are an essential item to assist with the tricky little pieces…….
So here they all are….a platter of freshly picked William Morris flowers waiting to be planted!…..
And Ta Da…..here it is all appliquéd and pieced together! It is a large quilt (106 inches square before the quilting), and is already quite heavy ………..
I have dreaded basting this quilt as it is so large so a very dear friend has come to the rescue! Jude is a long arm quilter and has done quilting for me before and this time she has offered to machine baste it for me on her long arm machine…….I am so blessed to have her as a friend. Tomorrow she picks it up and then in 3 days it will return home to me to complete the quilting. It is pictured here on a double bed - much smaller than the King's Chamber bed so stay tuned for more news after the quilting!