Meanwhile I indulge myself in finishing quilts for workshops! I have finally completed the felted wool quilt just in time for workshops starting next week.......
I decided on a black and white polka dot for the binding which I am really pleased with. Speaking of bindings I did take the opportunity of photographing step by step how I apply my bindings. (for those of you new to this technique). I did cut my strips 2 3/4" wide for this quilt as I wanted it a little wider with the thicker background. Normally I would cut 2 1/4" to 2 1/2"
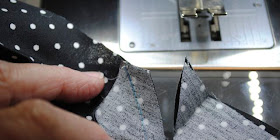
This photo shows how I mark the corner edge of the quilt with a pin. Stop 1/4" from the pin and anchor the stitch - you do this on each corner. You will notice I used a dark batting as the background of the quilt is so dark.
Take your work out from the machine and fold the binding up and then down holding the top to create the fold. You can see this better below.......
Ooops.....I missed a photo stitching from the edge of the quilt over that fold and then continuing down the edge.
I stitched the rid-rac over the block seams as a part of the quilting leaving a little overhang which is now tucked under the binding. I like to have a 'hidden' seam on completion so you need to allow enough fabric at the beginning and end to create the join. Start and finish with about 6" to 'play' with. Fold each end back as you see below and then trim half the measurement of your cut binding. If you have a 2 1/2" binding you trim back 1 1/4" from the fold. I usually go just shy of that measurement.
Cut where the pins are.........but just cut the top - not the binding closest to the quilt!
Hold the quilt so that the bulk of it faces you and the finished binding edge is away from you. Open the binding and then join on the cross like you did when you joined all the binding strips to start with. Mark with a pen the diagonal line and then stitch on this line.......
Trim the excess triangles and finger press the seam open........
When you lie the binding flat it will fit perfectly so now you can complete the stitching. No-one will know where you stopped or started....well hopefully! It was great exercise to just photograph the quilt up close as it gave me reason to go back and do a load more quilting around those feathers.....I didn't like the bulge between the finished feather and the ric-rac! And I like to trim my excess batting and quilt backing after I have attached the binding - I like to have that excess to 'hold' as I stitch on the binding.
And we can't finish a blog with out the latest bit of fun........bubbles in the bath at Nanna and Poppa's......
Have a great week wherever you are x


hello,
ReplyDeleteI like your seams have been hidden.
Congratulations on a spectacular job.
Greetings from
Palencia
(Spain)
We like Larry's Canada shirt!
ReplyDeletexo
Penny & Paul